How often do we admire the work which the GNOME project
has brought out and wish that we too could have created something which could
be called "my software" on Linux? Well, if you are interested in developing
Linux programs, the best tool that can come to your rescue is Glade.
Now, the question arises, "how do we learn Glade?". Glade
is actually a tool that creates the interface, i.e. the windows, the dialogs,
the widgets, and creates a framework for your code. It creates the necessary
files in the source code where you have to do all the coding manually. Therefore
it is quite easy building an interface with this tool. This means, you:
Use Glade and create the interface
Build the source code using Glade
Edit the source code manually (through emacs or gedit)
Compile your project files
In this tutorial, you will see how to create an interface and
how to link certain widgets with one another.
Creating the interface
The Glade Environment (Click for
a larger view)
Open Glade. You will see a number
of component windows of Glade. They are Glade (Main), Palette, Properties, etc.
(See figure above for an example environment) Proceed as follows:
Click on Window in the Palette (usually
the first icon). By this, a window is created which will form the main window
for this tutorial program. You’ll see that window1 is added to the
Glade window. Double click it. This displays the windows for
editing.
Select Fixed Position in the Palette
(you’ll find it somewhere down) and click in the window1.
[Note for other programmers: Using a fixed position
container is easier for beginners rather than using vertical and horizontal
boxes etc. Besides, all who have previous experience with Microsoft Visual
Basic/C++ or Power Builder will find it more comfortable to adjust. Using
vertical and horizontal box containers can be left for a later stage in
the course for a beginner learning Glade.]
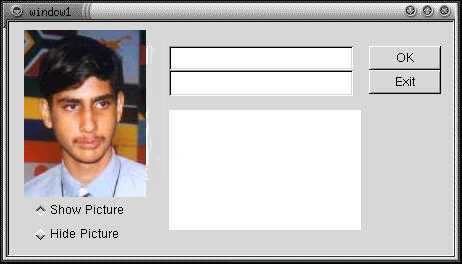
Add two text entry widgets, two buttons, one pixmap
and two radio buttons to your container in the window1. Also add a
list widget.
[Tip: You can move your mouse over the icons in the
palette and wait for a second for the ‘tool tips’ to popup. Take a while
exploring these tool tips so you are comfortable with the development environment.]
Name one button as BT_OK and label it as OK. Name the other
button as BT_EXIT and label it as Exit. (You can select the
button and change the Name and Label from the Properties window.)
Similarly name the two text entry boxes as entry1 and entry2.
Name the radio buttons as radiobutton1 and radiobutton2 and
label them as Show Picture and Hide Picture respectively. Name
the list as list1. Name the pixmap as pixmap1 and assign any
xpm file of your choice to it.
Click on the window1 on the Glade window and from the Properties
window, select suitable width and height for your window.
Your interface should now look somewhat like this:
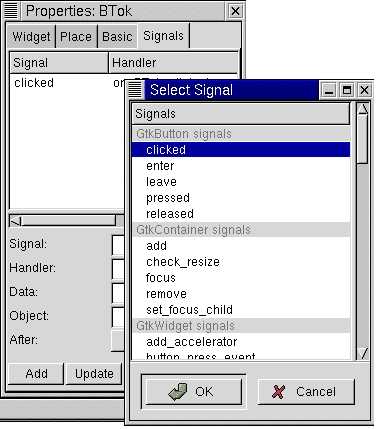
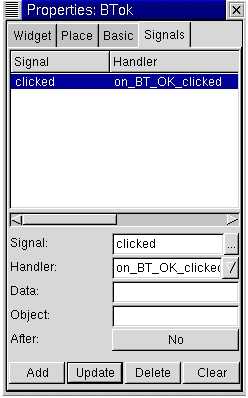
Now select your Exit button. Click on the Signals tab on the
Properties window. Here, add a signal as clicked
(Click at "..." button and select "Clicked" in the windows
that pops up and then click Add in the Properties window. See the figures
below!) with the suggested function name on_BT_OK_clicked. Do the
same for the other button. For the radio buttons, add the
released signals. In both the occasions, accept the default function
name which Glade provides. Click
at window1 from the Glade window to change to properties of the Window.
In the signals tab of the property window, add a destroy signal.
Adding the Signals (After Clicking
"..." button)
Adding the Signals (After Clicking
Add button)
Now save your project. The Project Options dialog will appear. Here
select the path of your project, e.g. /home//Projects/Project1.
Select C as the programming language. Once you are through with Project
Options, click at the Build Source button from the toolbar for Glade to write
the code for your interface.
Editing the code
Now that we have successfully created the interface and
built the source for it, the time has come to edit the code. Since Glade is
not an Integrated Development Environment (IDE) like Visual Basic, Visual C++
etc., you will need to edit the code using an external text editor. Most programmers
use emacs as their favorite text editor for coding, but I prefer using
gedit, since it has a multiple document interface (MDI). The choice of
editor is up to you!
Whichever the text editor it might be, fire it up. Assuming
that during building your source you gave /root/Projects/Project1 as the directory
of your project, open the file /home//Projects/Project1/src/callbacks.c
in your editor. This is the file where all the callback functions are written.
What I mean is that you can assign any functions to the widgets that you connected
during adding the signals. So, this file is mainly responsible for the interactivity
between the widgets, e.g. buttons, etc.
Scroll down the file until you come across the function
on_BT_EXIT_clicked. In the space that is provided within the function,
add a function: gtk_main_quit(); Your function should now look like this:
void
on_BT_EXIT_clicked (GtkButton
*button,
gpointer user_data)
{
gtk_main_quit();
}
[Note: The gtk_main_quit()
function causes the program to end. Another alternate function exit(0);
can also be used for the same purpose.]
Do the same for the on_window1_destroy function. That
is add gtk_main_quit() function there also. This ensures that when the
window is closed using the 'X' button on the upper right, the program
ends.
Similarly, add the following code to the on_BT_OK_clicked function:
void
on_BT_OK_clicked (GtkButton
*button,
gpointer user_data)
{
/* INITIALIZATIONS
START HERE */
GtkEntry *two;
// this will
be used for the second entry
GtkWidget * listitem;
// These will
gchar str[50];
// be used
gchar * p_str = str;
// for the list
GtkWidget *dialog, *label, *okay_button;
// These will be used for the dialog
char *text;
/*
COPYING THE TEXT ENTERED IN ENTRY1 TO THE LIST WIDGET */
This piece of code is quite simple to understand. What
the on_BT_OK_clicked function does is as follows:
Copies the text entered by the user in entry1 to entry2
Copying the same text to the list widget as an item
Creating a dialog box displaying the text of the entry1
Now that the coding part is done, now you have to proceed compiling
your project.
Compiling the Project
Open a terminal window. Go to the project directory, i.e.
/home//Projects/Project1. Before
making the project, one needs to make check the configurations of the current
setup. For that run ./autogen.sh. After that, type make and when
you have successfully made the files without any errors, type make install
to complete the installation. Type project1 to run the program!
Overview of this tutorial
This small tutorial will let you understand
simple interactions between widgets. This will also explain how to compile
and run your projects. I hope you benefit from this tutorial. Please mail
in your suggestions to me at ichattopadhyaya@yahoo.com.
Please SIGN
MY GUEST BOOK for your suggestions or visit my website: http://www.geocities.com/ichattopadhyaya.
I am currently a 15 year old high school student
and cannot devote all my time to Glade and GTK+ programming. But I hope
to come up with a few more tutorials like this. Enjoy Glade!